What Is a Magnetic Box, and How Is It Made?
Blog
May 23, 2026
·
8 min read
by Jinglin Team
What is a magnetic box? And how do you make one? As a packaging product that has become increasingly popular in recent years, you’re bound to have many questions about it. This article will tell you about magnetic boxes and how to make them — from materials to final assembly.
01 What Is a Magnetic Box?
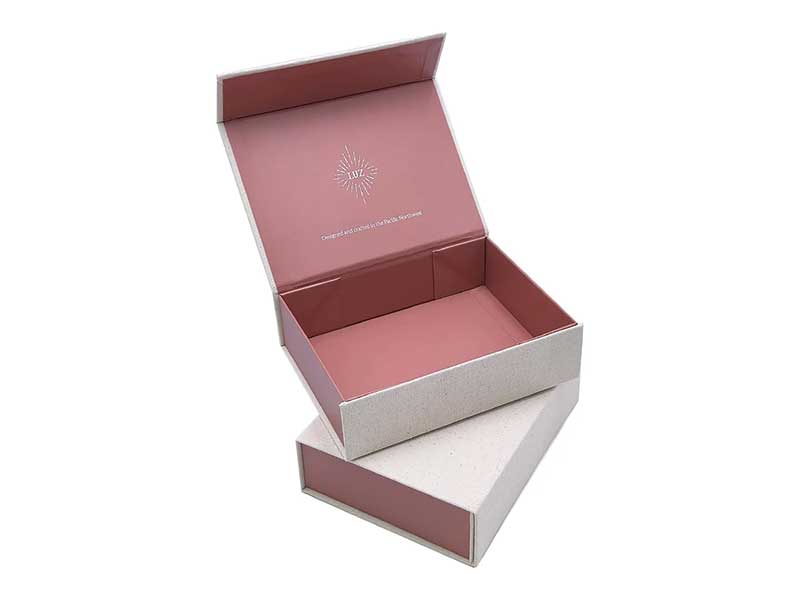
What is a magnetic box? As a new type of packaging product that has gradually gained market share in recent years, why is it so popular? You can see it in any product industry, whether it’s cosmetics, medical supplies, food, or even sports brands… A magnetic box combines elegance with a secure closure, making it a top choice for premium packaging.
Magnetic boxes are a variant of rigid boxes, and can be further divided into two main categories:
Flip-top Magnetic Boxes
Folding Magnetic Boxes
But they all share a common feature: A sophisticated magnetic opening mechanism. They are typically equipped with two sets of hidden magnets, providing strong magnetic force to ensure the box closes effectively. Larger boxes may have more sets of magnets.
What is a magnetic box?
02 How to Make a Magnetic Box?
Want to make some magnetic boxes for your products? They can serve as samples before mass production packaging. Let’s learn how to make magnetic boxes together!
A magnetic box consists of the following parts: face paper, grey board, two sets of magnets, glue, and accessories of your choice (such as ribbon, plastic windows). You can think of their combination as: the grey board is the skeleton, the glue is the muscles, and the face paper is the skin. You can choose the grey board and face paper according to your preference. The most commonly used grey board on the market is 1200 g/m², with a thickness of about 2 mm. It is lightweight and has good drop and pressure resistance—ideal for durable products. You can also choose 1000 g/m², 1400 g/m², or 1800 g/m² grey board, each with different features and thicknesses. For the face paper, 157 gsm single-sided coated paper is the standard choice because it has good adhesion and printability, perfectly rendering the colors and patterns you need and bonding firmly to the grey board. Of course, you can also choose other types of face paper, such as linen paper, textured paper, and imitation leather paper.
Now, please prepare and process the raw materials:
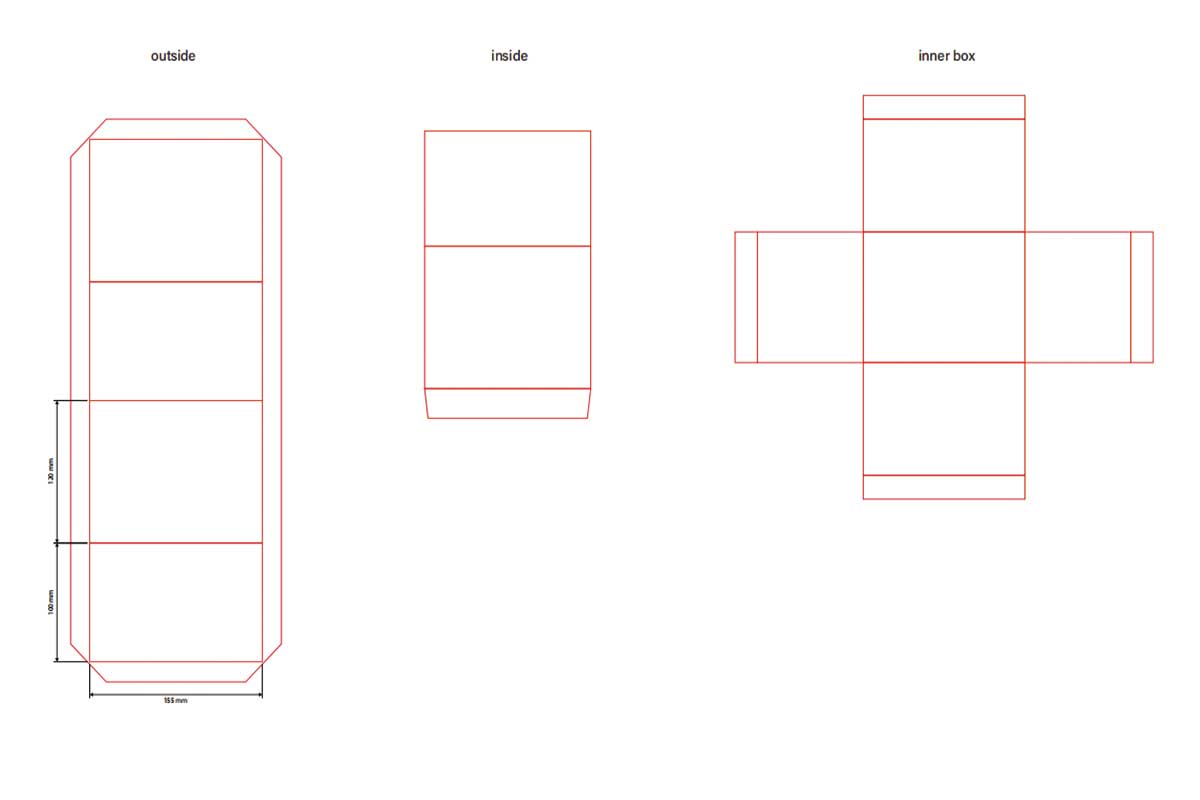
1. Create a die-cutting template: Design and create a die-cutting template according to the dimensions of the packaging box. A good die-cutting template will make subsequent production smoother. You can find general templates online or use certain software to create die-cutting templates, or contact us to obtain a die-cutting template of the required size.
2. Design and printing of the face paper: Create and print on the face paper you have chosen. After completion, please laminate the face paper.
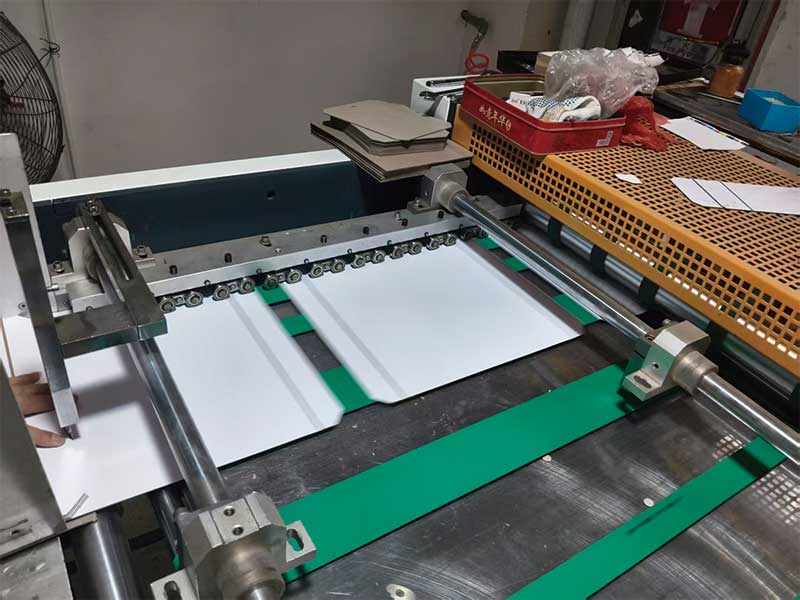
3. Cut the paper and gray board according to the cutting lines on the die-cutting template: Packaging wholesalers usually have dedicated paper cutters and V-cutters, but we need to use some hand tools to cut according to the fold lines on the die-cutting pattern. Please note that when cutting the gray board, do not cut it completely off! Keep the gray board intact for easy pasting and positioning. In addition, the die-cutting pattern will indicate the position of the magnet, usually located in the center of the left and right sides of the opening. Cut two round holes in the gray board that match the size of the magnets so that they can be inserted—this is crucial.
V-cut machine of Jinglin Packaging
Example of magnetic box die-cutting design
03 Assembling the Magnetic Boxes
Once you have the raw materials ready, you can begin assembling the boxes.
The assembly steps for magnetic boxes are as follows: face paper + grey board + magnet + face paper.
1. Apply a layer of glue to the unprinted side of the face paper.
2. Glue the grey board onto the face paper, avoiding misalignment as much as possible.
3. After gluing the grey board, fold along the creases and press firmly with a suitable tool.
4. Insert the magnet into the previously cut round hole. You also need to glue two small metal pieces to the other end of the box, aligning them with the magnet to achieve magnetic closure.
5. Glue the other side of the face paper onto the exposed grey board using the same method. This completes the production of the double-sided printed product.
The internal structure of the box needs to be made according to different box shapes. The interior of the folding cardboard box consists of two side panels, and its production process is the same as above. First, you need to cut the face paper according to the die-cutting pattern, then apply glue, insert the back panel, and finally fold it in half. If you need to make a magnetic flip-top box, you’ll need to cut the face paper and backing, and tape the four corners together; the remaining steps are the same. Mastering these techniques will allow you to create professional-grade packaging boxes.
Now you should have a basic understanding of magnetic packaging boxes and how to make them. If you’d like to learn more about this type of packaging, you can visit our design media platform to watch the production process, or contact our customer service staff. If you require mass production, please feel free to contact us.
Ready to order custom magnetic boxes?
View our magnetic box collection or request a free quote today.
View Magnetic Boxes →
Frequently Asked Questions About Magnetic Boxes
What is a magnetic box?
A magnetic box is a variant of rigid boxes that combines elegance with a secure magnetic closure mechanism. They are typically equipped with two sets of hidden magnets, providing strong magnetic force to ensure the box closes effectively. Magnetic boxes can be divided into flip-top magnetic boxes and folding magnetic boxes.
What materials are needed to make a magnetic box?
A magnetic box consists of face paper, grey board, two sets of magnets, glue, and accessories of your choice (such as ribbon, plastic windows). The most commonly used grey board is 1200 g/m² with a thickness of about 2 mm. For face paper, 157 gsm single-sided coated paper is the standard choice.
What is the V-cut process in magnetic box manufacturing?
The V-cut process uses a V-cutting machine to cut along the fold lines on the die-cutting pattern. When cutting the gray board, you do not cut it completely off — you keep the gray board intact for easy pasting and positioning. This creates precise folding lines for professional assembly.
How do you assemble a magnetic box step by step?
The assembly steps for magnetic boxes are: 1) Apply a layer of glue to the unprinted side of the face paper. 2) Glue the grey board onto the face paper. 3) Fold along the creases and press firmly. 4) Insert the magnet into the pre-cut round hole and glue metal pieces to the opposite end. 5) Glue the other side of the face paper onto the exposed grey board.
Where can I get custom magnetic boxes for my brand?
You can contact Jinglin Packaging for custom magnetic boxes. If you require mass production, please feel free to contact us. We offer various grey board options (1000 g/m², 1200 g/m², 1400 g/m², 1800 g/m²) and face paper types including linen paper, textured paper, and imitation leather paper.
Follow Our Packaging Journey